This guide will give you a procedure to follow to start optimizing the setup on virtually any car. So as not to fill the guide with repeated information, it is assumed the reader has a basic knowledge of racing and setup terms. Readers may want to look through our Racing Terms Glossary first. This guide is primarily aimed at road course racing in cars, but will have some use for kart and oval racing as well. Also, understand that learning vehicle dynamics and setup can be a very complex subject. This guide is simply a jumping off point to hopefully get you in the proper mindset for learning about car setup and we are glazing over a lot of the background information needed to truly understand the "why.”
Ranking the adjustments
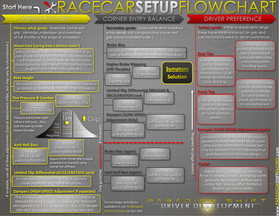
Before you can effectively set up your car, it's important to first understand the relative importance of all your setup options and how they interact with each other. Some adjustments are vastly more important than others in finding lap time and so it's generally important to focus on those first in an effort to increase grip and overall performance. Some adjustments can be adjusted based on driver preference however, which will typically change over time as car control improves. Finally, there will also be adjustments that may fall in several categories or switch categories as your skills evolve. In the individual adjustment sections we will go over how each setup adjustment will fit and crossover within these categories. We've also created a supplementary setup flowchart that you can find here.
1. Grip - First priority
| All else being equal, the car with the highest grip will be fastest and this should generally be your number one priority with setup. While virtually every setup option will have some effect on grip, the two that are basically a no-compromise setting should be camber and tire pressures. These should almost always be set to try to achieve the maximum grip possible, even for the novice. Because they control the size and shape of the contact patch, camber and tire pressure have the largest effect on the maximum grip a tire can achieve. Although these can also have an effect on the way the car feels to drive, there are typically better ways to alter handling to suit a driver's preferences than compromising these. As your skills progress, other adjustments, especially those that primarily affect steady-state handling will start to fall into the all-important grip category. |  |
2. Driver Preference
In the beginning, many settings will often fall within this category, and then they will move up into the grip category as driver skill improves. Many of the settings in this category have a lesser effect on vehicle grip and adjusting them to what allows the driver to feel most comfortable will initially be most important. These will be settings such as brake bias, toe, caster, damper settings, and vehicle balance primarily set through anti-roll bars. All of these settings do have an effect on grip potential, but it's either minor, or in the case of vehicle balance and brake bias, the optimized setting might be too hard for a novice to drive effectively. In general, the larger the effect a setting has on the transient handling of a car the more likely it will remain in this category.
3. Track
Track optimization can be some of the least important or most important adjustments you make based on the car you are driving. For instance, if you have a car with adjustable gear ratios you should be setting those appropriately for the specific track or you are giving up easy speed. The same can be said for aero settings if you have adjustable elements on your car as well. For road course racing however, attempting to dial in track specific optimizations such as asymmetric setups is typically not recommended for most racers without advanced tools such as track simulation software and shaker rigs. It's generally not worth the time investment. Any theoretical time gains are usually so small that only a world-class driver and setup program will be able to exploit them and take advantage. For most, these changes will be hidden in driver noise and time would be better spent working on the driver, not the setup.
steady-state vs transient handling
We mentioned this briefly in the last section, but before we go any further it's important to understand the difference between steady-state and transient handling. Although we talk about these as categories, they are actually a spectrum. The easiest way to identify where on the spectrum you are is how fast the suspension is moving. The far end of the steady-state handling side would be when there is no suspension movement. An example of this would be a car in the middle of a long, smooth, constant-radius turn. On the other end of the spectrum would be the fastest suspension movements the car is going to experience. This could be the transition from one side to the other in a chicane, a big bump in the track, or a quick steering correction of the driver. All of these create very fast movements of suspension. The further toward one end of the spectrum you get, the greater an effect a certain adjustment will have depending on its category.
In general, the adjustments that affect steady-state handling will have the greatest impact on the maximum grip a car can achieve. These would primarily be items like camber, tire pressures, and steady-state balance adjustments like springs and anti-roll bars. Not coincidentally, they will also be at the top of the list because they are typically the most important items to focus on to increase grip potential. A skilled driver tries to keep the car as stable and close to steady-state as possible so they can better exploit these settings. The items that primarily affect transient handling on the other end of the spectrum have less of an impact on the maximum grip and performance on most tracks. These would be items like dampers and toe settings.
In general, the adjustments that affect steady-state handling will have the greatest impact on the maximum grip a car can achieve. These would primarily be items like camber, tire pressures, and steady-state balance adjustments like springs and anti-roll bars. Not coincidentally, they will also be at the top of the list because they are typically the most important items to focus on to increase grip potential. A skilled driver tries to keep the car as stable and close to steady-state as possible so they can better exploit these settings. The items that primarily affect transient handling on the other end of the spectrum have less of an impact on the maximum grip and performance on most tracks. These would be items like dampers and toe settings.
be objective
It is human nature to search for cause and effect and many drivers, especially those with a limited knowledge of vehicle dynamics, have a tendency to attribute a perceived change in handling to a setup adjustment where no actual link may exist. A driver's car control ability is such a huge part of the overall equation that it is very hard to separate the driver's influence from a setup adjustment. That is why it is very important to use techniques during your setup process to gain objectivity. Some of these techniques are specific to a certain adjustment and we will cover them in this guide, but one technique that you can almost always use is to work with a partner and make blind adjustments where the driver doesn't know what was adjusted. Many times having a certain expectation can alter the way you drive, but not knowing what adjustment was made will not only allow you to be objective with results, but will also allow you to develop greater sensitivity as you try to detect what setup changes were made.
You can have some real fun with a driver by changing absolutely nothing and then listening to the feedback. Some drivers love to brag that they can feel every tiny little adjustment on the car. Don't be that driver. In our experience, unless it's a large adjustment, only a very small percentage can accurately detect the difference and it's usually prefaced with "I'm not sure, but...” For many smaller adjustments, the handling difference can be so small that you will have to usually look at data to notice the changes.
You can have some real fun with a driver by changing absolutely nothing and then listening to the feedback. Some drivers love to brag that they can feel every tiny little adjustment on the car. Don't be that driver. In our experience, unless it's a large adjustment, only a very small percentage can accurately detect the difference and it's usually prefaced with "I'm not sure, but...” For many smaller adjustments, the handling difference can be so small that you will have to usually look at data to notice the changes.
Trust your (objective) results
On the flip side, if your results show that your settings are faster, don't be afraid to follow them even if it means going against what might be considered the popular opinion for your car or class. Many times, what is popular in a class can often be traced to a successful team or driver who preferred that setup for certain reasons that may not necessarily be based on objective speed. Even if it turns out your initial data and conclusions are wrong, as long as you keep testing and trying new things you will learn a lot about the car and yourself along the way.
Tools and test bed
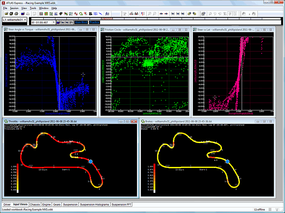
How objective you are able to be with results will also be influenced by the tools and testing areas you have on hand. Access to a basic telemetry system will be a great benefit and there are even halfway decent smartphone based options available for data analysis.
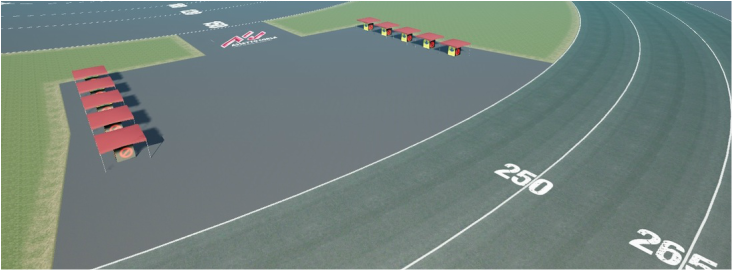
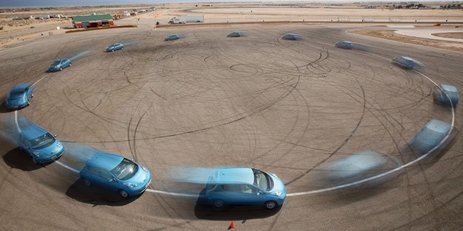
You also need to determine what testing areas you have available. Ideally, you would want to have access to a skid pad. This will allow you to accurately establish good baseline tire pressures and cambers as well as a good baseline balance for the car. For sim racing, this will be easily available, but we're going to assume most racers do not have access to a skid pad and will need to do their setup on track so we will primarily focus on that although we will provide instructions for initial skid pad based optimization as well.
A changing setup approach
As you progress your skills and develop your car, it makes sense that you will want to alter your setup approach. In the beginning, you will want to spend more time driving and finding the limits with a car setup that will support this learning process. As your skills improve, you will eventually want to move to a more objective approach.
1. Start with a baseline setup
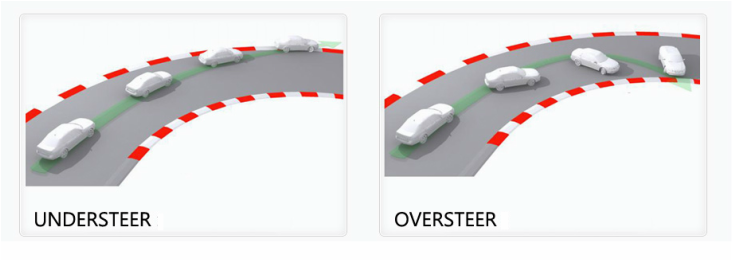
Ironically, some of the first advice we will give in this setup guide is to not change your setup at all. You can almost always find a good baseline setup for your car from another driver and sim-racing titles will normally have them preloaded. This gives you a great starting point from which to start driving, learning the car, and advancing your skills. A baseline setup will usually give the car a strong tendency to understeer at the limit, which is good for beginners, and we recommend to just drive the car as is until you can fairly consistently drive the car at the limit. For many cars and tracks, the difference between a baseline setup and a more optimized one can be as small as a few tenths. If you aren't even using the limits the baseline provides, then making adjustments is unlikely to help. This process can sometimes take years for some drivers so don't fool yourself into thinking that the faster drivers have some big secret setup. If you are 2 seconds off the pace in equal cars, the problem is the driver, not the setup. The biggest difference is always going to be driving skill, so work on that part first.
The only adjustments we might recommend at this point are those based on driver preference to allow you to be more comfortable as you learn to drive at the limit. A primary adjustment if you are having trouble getting to the limit is to shift the balance toward greater understeer by adjusting your anti-roll bars. Understeer is many times considered a bad word in motorsport, but a driver who is afraid of spinning and so doesn't push their limits is only slowing their learning process. Don't be afraid to do things that might not be considered normal if it helps you feel more comfortable. Go full stiff at the front and disconnect your rear anti-roll bar if necessary. It is perfectly normal to start with a very understeering setup and progressively work your way to a more balanced setup that offers higher limits as your skills improve.
The only adjustments we might recommend at this point are those based on driver preference to allow you to be more comfortable as you learn to drive at the limit. A primary adjustment if you are having trouble getting to the limit is to shift the balance toward greater understeer by adjusting your anti-roll bars. Understeer is many times considered a bad word in motorsport, but a driver who is afraid of spinning and so doesn't push their limits is only slowing their learning process. Don't be afraid to do things that might not be considered normal if it helps you feel more comfortable. Go full stiff at the front and disconnect your rear anti-roll bar if necessary. It is perfectly normal to start with a very understeering setup and progressively work your way to a more balanced setup that offers higher limits as your skills improve.
2. adding in basic adjustments
As you start to feel more comfortable exploring the limits of grip, you can start making adjustments based on simple measurements such as tire wear/temp and car balance changes. This should at first primarily be anti-roll bar changes as you experiment with less understeer. You will want to alter this until you have a more neutral setup that will go into oversteer at some points on track and then you can start experimenting with other changes that might affect steady-state grip, transient grip, or both. We'll go over these individually in their sections below.
One simple, but powerful tool you can use at this stage is to make a setup change to see what its effect on balance is. Having a close to neutral setup balance is important for this approach, because many setup adjustments have a small effect on balance and it's quite hard to detect a small change in the amount of understeer if you were already understeering. But if you have a car that used to understeer regularly in a certain track section and now it oversteers regularly you can be pretty sure that your adjustment made a balance change.
It's also important to understand the difference between which adjustments alter tire grip and which shift balance. Although the result may feel the same to the driver, the effect on vehicle performance is very different. To drive this point home let's look at a quick example. If you have a car that oversteers in a certain corner you would ideally first want to make adjustments to pressure and camber at the rear to increase grip and try to reduce the oversteer. There are a few other things you could try, as we'll go over later, but these would be the primary ones. If you weren't able to increase grip at the rear you would want to shift balance, which would most likely be through an anti-roll bar change. Whether the anti-roll bar change was at the front, rear, or both, a balance change that reduced the oversteer and brought the car closer to neutral would be an increase in overall grip. What you would not want to do is make an adjustment that altered the front tire grip. If you adjusted front pressures or cambers to reduce the oversteer, you have done so by reducing the overall grip. Even though the car might feel better to drive, you've just made it slower.
This basic adjustment stage is about increasing sensitivity to be able to detect setup changes as much as it is about increasing performance. If you have a very sensitive driver, you can create a pretty good setup using balance-based adjustments alone, but be careful about the human tendency to link an expectation with the setup change. Nobody is totally immune to this and even the best drivers can be fooled. Also, we call these basic setup adjustments, but crude might be a better word. So far, all the tools we have used are only giving hints as to what the car is doing, but unless this is backed up by a faster lap time, you don't really know. For that, we really need to use...
3. a time/telemetry based approach
At some point during your learning process, you will want to start making use of some basic telemetry. You can start to take advantage of telemetry at any stage to track your driving improvements, but until you are regularly able to drive at the limit, you don't want to use it for setup changes. Until you have reached the limits your current setup provides, you'll be unable to objectively increase those limits.
If you have a world-class driver available, all you need to do at this stage is make a setup adjustment and then do some laps. If you went faster, than it was a good change. This is not a reality for most drivers however and so we will need to use telemetry to look at our results in the most objective way possible by reducing the effect of driver error and noise. In the individual sections below, we will look at specific strategies for doing this for each adjustment.
If you have a world-class driver available, all you need to do at this stage is make a setup adjustment and then do some laps. If you went faster, than it was a good change. This is not a reality for most drivers however and so we will need to use telemetry to look at our results in the most objective way possible by reducing the effect of driver error and noise. In the individual sections below, we will look at specific strategies for doing this for each adjustment.
sim racing considerations
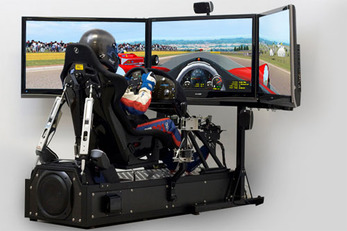
Although this guide applies to real as well as sim racing, there are some considerations sim racers should keep in mind. The more accurate a sim is, the more likely you will able to use any of these setup methods. You can certainly use these methods with more modern sim racing titles like iRacing and Assetto Corsa, but they will also be applicable for even older titles like Live For Speed and Rfactor. You can also use the same principles here with console-based racers such as Forza Motorsport or Gran Turismo although you will have more limited information provided from the program. A sector time and/or balance based setup approach is usually best for console titles.
In general, with sim racing titles, due to the ease of use and repeatable conditions, you can very effectively use a time/telemetry based approach. Most allow native telemetry exporting or require a simple plugin for use with a free version of Motec. This is a great way to learn telemetry, as you can make adjustments quickly, have access to skid pads, and have an identical car, tires, and conditions every single time. This will allow you to spot small differences in results much easier. Once you've mastered the use of telemetry in a sim title, transferring that knowledge to use in your real car will be much easier.
In general, with sim racing titles, due to the ease of use and repeatable conditions, you can very effectively use a time/telemetry based approach. Most allow native telemetry exporting or require a simple plugin for use with a free version of Motec. This is a great way to learn telemetry, as you can make adjustments quickly, have access to skid pads, and have an identical car, tires, and conditions every single time. This will allow you to spot small differences in results much easier. Once you've mastered the use of telemetry in a sim title, transferring that knowledge to use in your real car will be much easier.
The Setup adjustments
In this section, we'll start going through the adjustments one by one. To give you a general idea what to focus on we'll start with the adjustments that will make the biggest difference to lap times and are most important for most cars. Note however that this is not necessarily the order you should actually do the adjustments. Oftentimes you will want to do the most important adjustments last as the other adjustments may cause a direct change or change the optimal settings needed on a more important setting. We'll cover these interactions in the respective sections.
optimizing the contact patch - camber/pressures
We put pressures and cambers at the top of the list because they are basically a no compromise setting and should always be set for maximum grip. They are adjustable on virtually every car and are the primary way we control the tire's contact patch. Everything in racing is ultimately about how the tire's contact patch interacts with the track. We'll go over this more in depth in a future article, but essentially these two settings are about balancing the load across the contact patch between the sidewalls and the center of the tire.
Start with tire Wear based camber/pressure optimization
Once you have a baseline setup for your car it's a good idea to start paying attention to tire wear patterns with the goal being even wear or a slight bias toward inside tire wear. This is not only easier than taking temperatures using a pyrometer, but will more accurately tell you how the tires are being used. Tire temperatures are typically affected by too many variables in road course racing to be of use for on track testing for much else that finding out if you are in the ballpark. It's popular wisdom that there should be some sort of ideal temperature spread on the face of the tire in the pits, but unfortunately, it's not that simple. Tire temperatures are really only going to give good data on a road course if you have advanced onboard telemetry with live tire temperatures. Using live temperatures will also show you the massive temperature changes and variations a tire undergoes and why looking for a temperature spread in the pits is generally not a good evaluation method. Tire wear however, mostly occurs during cornering and will more accurately show you how evenly the tire is being used there. It's still not completely objective, but it's generally better than a tire temperature method. You can just eyeball the wear, but this can take some time before you see any noticeable difference. If you use a tread depth gauge, you can get accurate results faster.
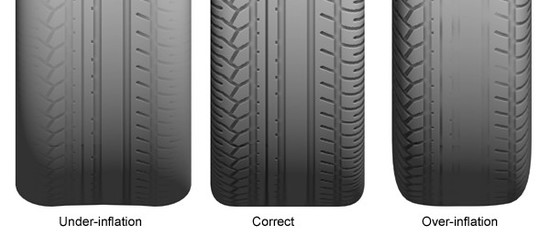
If you are noticing more tire wear on one side of the tire than the other, then adjust camber to compensate. Likewise, you can adjust tire pressures if you are noticing the middle is wearing more or less than the sides. Greater tire pressure will cause the middle to wear faster. Make sure you take your tread depth measurements about 1/3 of the way in from the edge of the tire. Don't confuse tire shoulder wear, as that is more indicative of an excess toe setting or possibly if camber is very far from optimal. Many unmodified street cars in autocross and track days don't have sufficient adjustment in camber to reach the optimum setting and will get excessive shoulder wear as the tire rolls over onto its sidewall. Some drivers will use excessive air pressure to stiffen the tire to prevent the sidewall from rolling over too much. This should only be a stopgap measure however. Increasing camber if possible, stiffening roll resistance through stiffer anti-roll bars, and lowering and stiffening the suspension will all help allow the tire to get within a better range.
Wear based adjusting can produce a very viable setup and is a great bang for your buck technique as it's relatively easy to do and can produce good results. Road course racing is always an exercise in compromises so often finding a reasonable average setting is sufficient. So although we put camber and pressures at the top of the list, if you are a little bit off from optimal it's not going to make a big lap time difference. If you have the time and resources though, adding objective hard data to your setup program can be a benefit.
skid pad & telemetry based testing
The skid pad is the one place you can effectively use a pyrometer to get good results. If you have access to a skid pad, you can quickly set some good cambers and pressures by making adjustments until you have settings that give you an even temperature spread across the face of the outside tires. If you can, you will want to back this up with finding the average vector G achieved by using telemetry. This is better than using just lap times around the skidpad as slight line variations of the driver won't matter. Vector G is also better than lateral G as it will record maximum traction achieved rather than being modified by slip angles. Below is the formula to put in Motec to find Vector G.
sqrt(sqr('G Force Lat' [G]) + sqr('G Force Long' [G]))
Use this time to also find out about the difference between pyrometer based results and telemetry based. If you have any discrepancies in your findings, you want to always go with the telemetry/time based findings because in general, although an evenly heated tire will be faster, there are so many variables that it's not always the case. Using the pyrometer will be useful in the beginning though because it will save time in getting close to the optimal settings. Once you are close however, you will want to go primarily by average vector G. It's important to use average as there is too much noise using the maximum G achieved at one singular point around the skidpad and a driver's inputs could cause a momentary unrealistic spike.
As you are searching for optimum settings, it's important to realize that adjusting tire pressure and camber will produce a bell curve on the maximum grip a tire can achieve. How sharp/flat this curve is depends on the tire, but there will always be an area near the middle where you won't see a big change in grip. The center of this area is what you want to find, as that will give you the highest average grip on track. Unlike oval racing, road courses are often made up of many different corner geometries, elevation changes, and bankings so there is usually no one ideal setting for camber and pressure. Typically, the best you can do is finding a good average. It's also important to understand that pressures and cambers will each have their own bell curves and these curves interact. The tire pressure that achieves the highest grip will vary with camber setting. Likewise, the optimum camber setting will vary with tire pressure. The goal is to find what combination produces the highest grip.
The best way to do this is to use an XY chart to track out how variations in pressures and cambers affect grip. You would have tire pressures on one axis and camber on the other and then you would fill in the chart with grip achieved. It's generally easiest to do a quick sweep of pressures starting at the top of the chart and working your way down by bleeding off air between runs. Make sure to also track temperatures throughout to make sure the tire is staying in the same temperature range and not getting overheated or cooling off too much between runs. It's also a good idea to go through the sweep more than once to verify results. Once you've done a pressure sweep, make a decently large camber change such as .5 degrees and then do a smaller sweep around the point where you achieved the highest grip prior. You can then do smaller camber changes once you've found the trend and are honing in on the optimal setting at the top of the curve. This can be a lot of work, but will not only show you where the peak of grip is, but also how sensitive the tire is to changes. If you don't have access to a skid pad you can do this sort of testing on track if it has a long constant radius corner by setting a custom sector for that portion, but it's going to take longer and be harder to get consistent results.
Anti-roll bars - adjusting steady-state Balance
Anti-roll bars belong near the top of this list because they are going to be the primary way that a driver adjusts the car's balance and will be one of the most frequently adjusted settings. Some cars even allow these to be adjusted directly from within the cockpit. As mentioned earlier in the guide, anti-roll bars don't directly add or take away grip; they simply shift how the load is distributed among the tires during cornering. This causes a balance shift because of a tire's load sensitivity. You can accomplish the same balance shift through spring and roll center changes, but those are harder to modify usually. Understand that any of these changes can also cause the car to handle bumps differently as well as changing the car's overall roll stiffness. This can change the camber angle the tires corner at so any change in anti-roll bars might require a camber adjustment as well. Overall roll stiffness will also cause the car to feel different in transient handling with greater overall roll stiffness causing the car to respond faster. So if you like the way a car feels and you have good camber settings, make sure you make even adjustments front and rear to keep the overall stiffness the same. If you soften the front, make sure you stiffen the rear proportionately, and vice versa. This allows you to make balance changes without the necessity of making other changes to the car's suspension to compensate.
We'll explain the more technical and theoretical side in depth in a future article, but for now just understand that whether you adjust the front or rear anti-roll bar, if you move the car closer to neutral balance you are increasing the car's overall grip potential. Any adjustment that moves a car toward greater understeer or oversteer lowers its overall grip potential. It's also important to pay attention to where you ideally want this more neutral maximum grip handling to be though. Car balance will change due to track variations as well as driver induced changes such as braking or going to the throttle. A driver's car control skill and preference will generally always remain the overriding factor over the desired car balance. A novice driver will typically want a very stable car that understeers readily and gives them confidence to push their limits. As a driver's skill progresses, they will want to shift the balance toward less understeer as this will increase the maximum grip a car can achieve and allow faster lap times.
We'll explain the more technical and theoretical side in depth in a future article, but for now just understand that whether you adjust the front or rear anti-roll bar, if you move the car closer to neutral balance you are increasing the car's overall grip potential. Any adjustment that moves a car toward greater understeer or oversteer lowers its overall grip potential. It's also important to pay attention to where you ideally want this more neutral maximum grip handling to be though. Car balance will change due to track variations as well as driver induced changes such as braking or going to the throttle. A driver's car control skill and preference will generally always remain the overriding factor over the desired car balance. A novice driver will typically want a very stable car that understeers readily and gives them confidence to push their limits. As a driver's skill progresses, they will want to shift the balance toward less understeer as this will increase the maximum grip a car can achieve and allow faster lap times.
Brake Bias
As a car decelerates, load transfers to the front tires, which improves their grip while decreasing the grip at the rear of the car. All load transfers like this are similar to the effect aerodynamic elements such as wings have on a car. They increase/decrease load on a tire without changing the weight. This can have a big effect on car balance so the primary goal is to adjust the proportion of the braking forces between front and rear (brake bias) in order to maximize overall braking efficiency. Many times however, adjusting the brake bias to what allows the driver to best control the car at corner entry is more important.
We'll go over some ways to set the theoretical optimum first and then talk about some of the compromises you may decide to make. The easiest way to set the optimum is visually. You will adjust the brake bias until the front and rear start to lock up under braking at the same time. You might want to have a slight forward bias to lock up the fronts just a little bit sooner for stability though. Either this can be done by having a spotter actually watch the car in a braking zone or another method is to attach GoPro type cameras to the car pointing at the tires. If you have wheel speed sensors, you could also use telemetry to do this. Some teams will use telemetry math channels to wire in separate warning lights that come on when a front or rear wheel locks up or is about to lockup. Although it can be a lot of work installing the speed sensors, being able to very quickly dial in and adjust the optimum brake bias is a great benefit.
If you have a sensitive and skilled driver, they will be able to set the brake bias simply based on how the car responds under braking and this might be the ideal way to begin setting your bias even for a novice. Although the theoretical optimum might be ideal for straight-line braking this might not provide the stability needed for carrying the brakes into the turn for trail braking. When a driver first starts experimenting with trail braking, it would be a good idea to set a more forward bias for extra stability and then slowly work their way rearward as their skills improve. Some drivers will actually set a more rearward bias than is optimal and use advanced techniques like mixing throttle with braking to have more control over the car at corner entry. There is not a lot of time to be gained by the theoretical optimum bias and it can change from corner to corner if there are elevation changes in the brake zone as well as with changing fuel loads, aero effects, tire grip changes, etc... Usually focusing on what makes a driver most comfortable under threshold braking, and trail braking will be the overriding factor.
Ride height
It's a good idea to decide on your ride height early in the setup process, as it often will directly not only affect several other settings, but will also change their optimum settings. Since ride height effects several factors we'll go through them one by one starting again with what is generally the most important.
Ride Height aero considerations
How dependent your car is on aero effects makes your ride height either extremely important or negligible. All cars will have at least some aero effects, although they could be so minimal as to have no influence on your setup considerations. Only testing will show how important they are. Cars with underbody aerodynamics such as splitters, tunnels, diffusers, etc... will see downforce, drag, and balance changes with shifts in ride height and rake. For certain cars, this will be the number one performance factor and almost everything done with the setup is in service of optimizing these effects. Truly optimizing these factors is outside the scope of this guide as you need tools unavailable to the average racer, but we'll go over some basic testing procedures you can use to get pretty close.
All cars will see at least some change in drag and downforce with ride height and rake changes and there are a few basic tests to see how much of an effect they might have. The easiest, but least accurate way to test changes in downforce is by tracking maximum vector G and balance changes on the highest/lowest speed corner of a track. This does require a skilled driver to do effectively, but is relatively easy. If you have access to a skid pad you can get better consistent results because if the corners have a different banking that will also change your grip levels. If a rake adjustments is gaining you more grip in the high-speed corner, but not the lower speed one then you might have a clue that your change improved downforce. Be careful with this approach, because as you'll see below rake will also directly affect car balance in the same way as anti-roll bar changes do. That is why we compare the high to low speed corner. You want to separate the aero effect from a mechanical balance change from rake that could also increase your grip.
A more accurate way and generally the best you are going to get outside of a wind tunnel is to install linear motion sensors on the suspension to track front/rear ride height changes with speed. You can then compare the measurements at rest from those at the end of a straightaway to track how rake/ride height/aero changes are affecting suspension compression. The more compression, the more downforce. More overall downforce does not always equal performance though as you have to be able to drive the car effectively as well so keeping the aero balance within a useable window is also important. In general, increasing rake will increase downforce, but also increase drag. Aerodynamics is complicated and can be counterintuitive sometimes so testing provides the only true answer.
To test for any changes in drag, the easiest, but least accurate way is to simply track how changes affect your end of straight speed if you have a long straight. You can make this test more accurate by using telemetry to track the acceleration from the same speed on the straight. This will correct for any changes in how well the driver navigated the previous corner leading to the straight. Make sure you do these tests under the same weather conditions as small changes in drag might be masked by wind or the weather's effect on engine power. The most accurate way to test drag outside of a wind tunnel is a coast down test, but most track event organizer frown on this during a hot session.
You have to test to be sure, but most cars, especially street based ones, aren't going to see big aero effects. So for most cars, the primary ride height tuning factor is going to be...
Ride height effect on CG vs bottoming out
The primary ride height consideration for most cars will be lowering the CG as much as possible without bottoming out excessively or running into suspension compliance issues. Lowering the center of gravity (CG) reduces load transfer and increases grip. All else being equal the lower we can get the CG the faster the car will be. At some point, you will start having issues with bottoming out on the track or having issues within the car's suspension however. You might start hitting bump stops or having issues with tires rubbing bodywork, etc... This will entirely depend on the individual car, but one way to test is to remove the springs and manually move the suspension throughout its range of motion to test for any interference. You can also use nondrying ink or similar on any suspected areas of contact to see if the ink transfers. The ink technique can be especially useful for testing to see if you are hitting the bump stops or have some other suspension interference. Many times sudden snap oversteers can be traced to hitting the bumpstops and it's often hard to tell if this is the reason without direct tests like this. Sometimes trimming bump stops after lowering can be beneficial. You will most likely still hit bump stops going over curbs however, and they are there to prevent suspension damage from springs coil binding so make sure not to trim too much.
A side effect of changing ride height is that you will change roll centers, which has an effect on overall roll stiffness and balance. Raising one end of a car will act as if you stiffened the suspension at that end. For example, if you lower the front ride height you are lowering the front roll center, which softens the front roll stiffness and makes the car more prone to oversteer. In general, these changes are going to be relatively smaller than making an anti-roll bar change, but it's something to keep in mind if the car is handling differently after a ride height change and you can't figure out why. Understand that it is actually not the amount of rake that causes the balance shift though, just simply the change in individual ride height of the front or rear. You can have a have a very steeply raked car that you would think would oversteer, but still make it understeer through other suspension settings. In general though, you just want to think of this as a side effect of ride height changes and not a way to tune the car balance. Lowering the CG will generally still be the overriding consideration. The only time you might want to use ride height changes to modify balance is if you are already at the end of your other adjustments and you still wish to have more oversteer or understeer.
A side effect of changing ride height is that you will change roll centers, which has an effect on overall roll stiffness and balance. Raising one end of a car will act as if you stiffened the suspension at that end. For example, if you lower the front ride height you are lowering the front roll center, which softens the front roll stiffness and makes the car more prone to oversteer. In general, these changes are going to be relatively smaller than making an anti-roll bar change, but it's something to keep in mind if the car is handling differently after a ride height change and you can't figure out why. Understand that it is actually not the amount of rake that causes the balance shift though, just simply the change in individual ride height of the front or rear. You can have a have a very steeply raked car that you would think would oversteer, but still make it understeer through other suspension settings. In general though, you just want to think of this as a side effect of ride height changes and not a way to tune the car balance. Lowering the CG will generally still be the overriding consideration. The only time you might want to use ride height changes to modify balance is if you are already at the end of your other adjustments and you still wish to have more oversteer or understeer.
Ride height effect on camber
Another consideration with a ride height change is the direct effect it will have on camber. In most cars, as you lower the suspension, the negative camber on the wheels will increase. The amount will vary based on suspension design, but it's almost universal that some camber change will occur. This may be beneficial by itself if the car's camber adjustment range is limited and the optimum camber is more negative than the adjustments allow at a higher ride height. If you have already established optimum cambers however, you will need to re-establish those if you change the ride height. This is one reason that establishing ride height early in the process is a good idea.
Dampers
Dampers are yet another adjustment that can be either extremely important or almost negligible depending on the car, track, and driver. Dampers were originally developed to simply keep a car from oscillating (bouncing uncontrollably) on its springs. In racing however, dampers are now the primary item controlling the transient handling of a vehicle. So as a track contains more and more bumps or quick transitions, dampers become increasingly important. The quicker the suspension has to move the more effect dampers will have. This could be from track bumps, quick transitions such as autocross slaloms, or even quick corrections done by the driver. For this reason, off-road racing teams spend considerable amounts of time on damper development because they are a huge part of the performance package. On a smooth track with no quick transitions however, the dampers become much less important.
While you can do many things with damper tuning that will affect balance in different phases of cornering, in general it is probably best to focus your efforts on using the dampers to improve the tires' road holding grip and tune the transient handling to your personal tastes. If the track is very bumpy or has curbs that will gain you a good bit of time by going over them then tuning the dampers to accommodate these should be your number one priority because you will be increasing grip. Remember grip is our primary goal. To do this properly requires a 7-post rig, but again like many setup adjustments dampers are always a compromise so you can get satisfactory results just going by feel and using telemetry to track cornering grip and speeds. In general, to improve road holding over bumps you will want to soften dampers up to the point that you get no more than one oscillation after a big bump. This means that the car goes to full compression during a bump, and then it can go into extension before finally settling back to its normal ride height. If you get a pogo effect because of a bump then you need to either increase damping or avoid the bump because it's too big for the suspension to handle. If the dampers aren't able to control the suspension and you get big tire load variations as the car is bouncing you will be decreasing grip.
The other end of this compromise is that as you soften up dampers to handle bumps and curbs better you are slowing down how quickly load transfers which changes your transient handling by slowing down how quickly the car reacts to inputs. Some drivers prefer a slower reacting car and some prefer a quicker reacting car. If a track is smooth enough that you don’t have to tune primarily for bumps then you are freer to use dampers to alter this. Theoretically, the quicker a car reacts, the faster it can be as the tires load up and go to maximum grip faster. This is generally a small difference and only if a driver is skilled enough to take advantage of the quicker loading will it actually be faster. In addition, this will primarily only be a benefit during track sections where a quick tire loading is required which is usually only in the center of a chicane as a driver goes from one direction to the other quickly. During a normal corner, the slower transitions cause damper settings to make much less of a difference.
If you have access to an autocross slalom this is a great way to tune as the constant quick changes of direction will cause the dampers to have a more pronounced effect on handling. To shift balance toward understeer during transition stiffen front rebound/compression or soften the rear. To shift balance toward oversteer you would do the opposite. Stiffening or softening all dampers together will speed up or slow down the car's reaction. There really is no right or wrong answer although if you can handle the quicker transitions of a stiffer damper it can potentially be faster. The differences are going to be fairly minor however as long as the dampers are in a reasonable range, so feel free to experiment. You can tune dampers at any point during the setup process, as they really don't have a direct effect on any other setting.
One other factor to keep in mind is how a car reacts when responding to quick driver inputs during a recovery. Some of the fastest suspension movements can be when a driver is trying to recover a car from a big oversteer and this is probably the time you want the biggest understeer safety net. So for extra stability, increasing the front damper stiffness and softening the rear more than you might like during controlled cornering might be a benefit especially to a more novice driver who tends to be a little sloppier with their inputs and is making big corrections more often.
So far, we have been speaking of limited adjustment dampers that adjust the stiffness of compression/rebound together. There are wide varieties of dampers available with the high end ones allowing separate compression, rebound, and high and low speed damping. Using separate adjustments, you can affect balance in different parts of the corner as well as have more individualized control over how the damper handles bumps vs how they respond to driver inputs. We plan to have a future article that will look into all this more in depth, but in general it's not worth focusing too much effort on as the time gains are generally very small and you need advanced setup tools to do it properly. Even then, there is usually large compromises to be made. You should be able to get very good road holding and transient handling characteristics out of basic single adjustable dampers as the driver has a huge influence on how the car acts in transients. Unlike with changes in the primary settings that control steady-state handling, a skilled driver would turn very similar lap times on most tracks with a wide variety of damper settings.
toe

Toe settings almost exclusively fall into the transient handling category and are mostly going to be driver preference. You can cause excessive drag issues if you go too far however, and there are some grip related factors that we'll cover as well, but these are generally fairly negligible for most road course driving. Toe settings are however, some of the most misunderstood and misused setup parameters. We're trying to keep this guide more "nuts 'n bolts" practical, but feel like we should cover toe a little more in depth here because of the general misunderstandings associated. These misconceptions are primarily dealing with front toe so we'll look at that first.
Front Toe
A primary purpose of adjusting toe is to alter how the vehicle responds to the initial steering input. Let's look specifically at what is happening at the tires as we adjust toe so we can learn more about it. The primary variable that toe will affect is how quickly the car reacts to steering movements right around center. If the vehicle has toe in at the front, as the driver turns the wheel the more heavily loaded outer tire which is supplying the majority of turning forces will already be generating a force into the corner so the car will respond more quickly and turn in faster. Contrary to popular knowledge, for a given amount of initial steering, toe-in actually causes a car to turn in quicker, not slower. A side effect of steering forces building quicker however is that there will be a greater self-aligning force on the steering wheel, which will feel more stable to a driver. This is a primary reason why road cars are typically setup with toe-in, as it feels more stable to an average driver that likes a car that has a tendency to track straight and has a very strong centered feeling in the steering.
On the other hand, if you have a car setup with toe out in the front, the car's initial turning would be slower for a given amount of initial steering. The outer tire, which is producing the majority of turning force, will have to go past center before it starts building forces in the direction of the turn. The more lightly loaded inner tire however, will already be creating a turning force into the direction of the corner. So with the initial turn of the wheel, the net effect turning force will still be in the direction of the corner, but it will be less than with toe-in. Because of the load transfer and relative importance of the outer tire over the inner in supplying forces, you can change how fast the car initially turns by modifying the initial slip angles. Put simply, toe-out creates a more gradual buildup of turning forces. The side effect of this slower buildup is that the steering will feel lighter and have less self-centering force. To most drivers this will make the car feel more responsive even though technically it is less responsive. Because of this paradox, it's easy to see where people's confusion with toe effects stems from.
Realize though that this is simply the tires and steering force response to a given steering wheel movement. The driver can always turn the steering faster or slower to get the exact same turning response provided by a different toe setting. So although a certain toe setting might feel better to some people, a skilled driver will be able to negotiate a corner in virtually the same fashion with several different toe settings by adapting and changing the rate of steering needed at turn-in.
It's also important to understand that although we usually think about toe's effect on initial steering, it actually will have an effect anytime a tire is initially building turning forces even if it's going from one direction to another such as in the middle of a transition or during a correction. Sound familiar? That's right. Toe settings will primarily have an effect in some of the same situations that dampers will. So should you tune your toe setting based on going through a slalom as you would with dampers? You might if you are an autocrosser who doesn't have to worry about long straightaways, but for most road course racing the most important factor in optimizing toe is probably in reducing drag.
Unlike altering damper settings, using toe settings to alter the transient handling of a car can also affect drag. A side effect of using negative camber on the front wheels is that the camber thrust will create a force trying to turn both wheels toward each other in basically the same way as toe-in would. This creates drag on the tires that slows the car down on straights. If you set some toe-out at the front, you can counteract this inward camber thrust force to reduce this drag. This is fairly easily tested by checking straightaway speed in a similar manner to the previous aero/ride height testing. We generally feel that whatever setting produces the least drag and best straightaway speed is the best one. This will most likely be with some minimal amount of toe-out that most drivers seem to prefer from a transient handling standpoint anyway, but even if some adaption to the transient handling is required, the higher straightaway speeds should be a welcome incentive.
We mentioned earlier that there are also some grip based factors that might need to be considered although this is primarily only going to be of importance to oval track racers. For a given cornering radius, there will be an optimum slip angle for both front tires. The optimum angle will usually be different for each tire, but with testing, you could determine this. In general, this will require greater toe out for slower corners and is the reason that steering geometry typically has a certain amount of Ackerman built in. Generally though, you will want to focus on drag reduction because the cost/benefit ratio of optimizing toe for cornering grip can be quite high. For example, if for a certain radius corner you determined that optimal cornering grip required 1 degree of toe out and Ackerman was giving you 2 degrees of toe out. You could run 1 degree of static toe in to compensate. While this would help your cornering speed in that specific corner, the difference in speeds attained would be very small and having 1 degree of static toe-in would have disastrous results for straightaway speed and would also not be optimal for any other corner. For oval racing, this sort of fine-tuning is beneficial, but for road course racing it's most likely best to tune for drag reduction.
Rear Toe
Rear toe settings will primarily have an effect on how quickly the car rotates (yaws) during a turn. Rear toe-in causes the more heavily loaded outside tire to start with a slight slip angle so the buildup in forces are going to start sooner and the maximum yaw for a given amount of steering will be less. For both of these reasons the car will feel more stable during cornering. The initial response is a much more significant effect than the final yaw achieved though. Rear toe-out will have the opposite effect and increase the rate of initial rotation and final yaw for a given amount of steering. But unlike front toe settings, the effects of rear toe are always going to be present, because while a driver can compensate for front toe settings by changing the rate at which they turn the steering wheel, the rear toe settings are going to directly affect the attitude of the car in a corner. Also just like front toe, rear toe settings are going to primarily affect the car in transients. While the overall maximum yaw for a corner will be greater and thus require less steering to negotiate the same turn, the difference will be fairly small. Rear toe out settings will be felt primarily during a fast initial turn in. While this effect can be minimized with a skilled driver, the change in yaw velocity as the tire crosses over center in a chicane or correction will be unavoidable.
For most cars, extra yaw velocity is not preferable, so it's almost universally understood that a car will want to be setup with some amount of toe-in at the rear, not only for the increased stability, but also because the tire's slip angles will normally be more optimized for grip during cornering. The one possible negative side effect of toe-in at the rear would be drag so it would probably be beneficial to do drag testing with various toe-in and toe-out settings at the rear to see how sensitive the tires are to changes. Some tires will tolerate more toe without a noticeable change in drag, but only testing will tell.
Also, take into consideration when working on a suspension setting with very small angles like toe that due to compliance in suspension linkages the measured static toe setting won't necessarily be the same as when the car is on track. It will change at least a little bit based on the loads, and in some cars, the change is not insignificant. There is not really a practical way for most racers to measure this, but the primary take away point is that if you are getting good objective results from a setting that might not seem logical it could be because of linkage compliance and the static setting in the garage is not the same as the on track dynamic setting.
Finally, although significant amounts of toe are generally not used for road course racing, sometimes when drag is not an issue such as autocross there might be a benefit to trying more extreme toe settings. Because of the constant transient maneuvers and low speeds, it might be worth experimenting with large toe out settings at the rear in cars that have a tendency to understeer during transitions. This handling behavior is not uncommon for many street based autocross cars with limited suspension adjustability and unorthodox toe settings might provide an answer.
Caster
Down at the bottom of the list we have Caster. Caster has many effects on a car and in general the more positive you go the better, but you will be limited by either adjustment range or steering effort. One of the most pronounced effects of increased caster is that primarily through increased mechanical trail, there is a greater centering force on the wheel and steering effort will increase. While this can be overcome with power steering and in sim racing you can simply turn down the FFB, in many racecars there will be practical limits on caster simply because it will fatigue the driver. But even if a driver is physically able to turn the steering, lighter steering in general helps a driver be more precise and improves car control.
One of the first and more well known benefits of more positive caster is that as you turn the wheel both front tires will tilt into the turn. This will cause the inside wheel to go more positive which is helpful for grip and on the outside wheel it will go more negative. This greater wheel tilting allows you to set a static camber that is less negative and will help with straight line braking when the steering is straighter. As the steering turns though, you will regain that negative camber right when you need it. You can go too far and get too much change in negative camber, but many times, you will hit either the driver's strength limit or the limit of car adjustment before you get there.
The other lesser well known effect of caster is that combined with the scrub radius, an increase in caster will cause the inside front wheel to move down and the outside front wheel to move up in relation to the chassis as the steering is turned. This causes the car to shift its balance progressively toward oversteer as the steering wheel is turned. This is generally considered favorable as car balance naturally shifts toward understeer the tighter the turn is. Racing karts actually use this effect to lift the inside rear wheel from the ground which is necessary due to the lack of a differential.
All around, caster provides benefits to car handling and within a reasonable range going more positive is going to be a good thing. While oval track racers will need to spend more time on optimizing caster, for road course racing with the wide variety of turn radiuses, you are not going to make any significant lap time differences if you are fairly close. Running a high caster setting will also come at the cost of increased steering effort so as you test and tune caster we generally feel it's advisable to simply go with whatever caster setting provides the most comfortable steering effort for you. Don't feel like you should try to compromise how the steering feels in an attempt to find performance gains as it's generally not going to be worth it. A comfortable steering effort and having improved car control will generally net you better gains.
I hope you enjoyed this setup guide. If you are interested in a complete guide to the physics of racing, we also offer The Science of Speed book series, available through our bookstore or at popular retailers such as Amazon.
by Adam Brouillard
by Adam Brouillard