How a Kart's rear is like a motorcycle
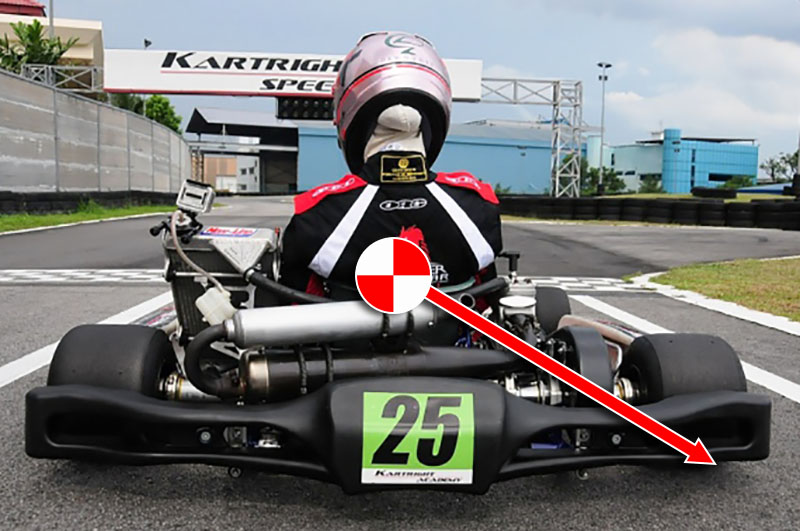
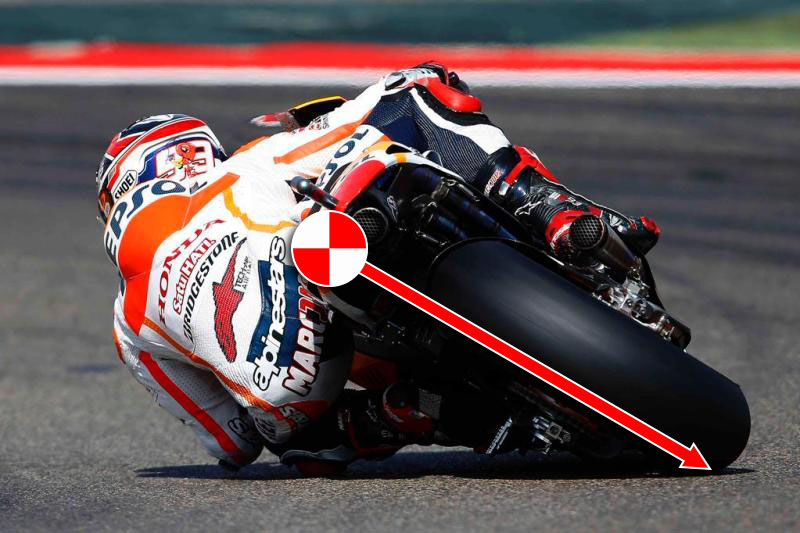
On a kart however, the needed "lean" angle must be preset through chassis setup. The location of the outside tire in relation to the CG must be set correctly to properly jack the inside rear tire. Too much or too little jacking can cause handling problems, but unfortunately as we learned from the motorcycle example, as cornering force increases, the needed angle increases as well. What this means is that a kart that unloads the inside rear properly when grip is high might not when grip is low. Even the difference between high and low speed corners can cause issues because of the steering geometry effects on the amount of jacking. The very tight steering needed for a hairpin might cause the inside rear tire to lift off the ground too high. As the kart starts to lift excessively, the outside tire's contact patch is no longer flat against the ground and so quickly loses grip. This loss of grip causes the inside rear to come crashing back down. Now flat against the ground again, the outside tire regains grip and the kart starts to lift again. This repeating cycle is one of the main causes of hopping that kart racers sometimes experience.
While motorcycles will lean to achieve this ideal center of gravity location, moving the CG of a kart is often not so easy. This usually requires redrilling and moving the seat or ballast. Fortunately there is a better solution. While moving the CG is difficult, we are really only concerned with the angle between the CG and the tire contact patch. So alternatively, moving the tire contact patch is relatively easy. This is usually accomplished by sliding the wheel hubs in and out on the axle. Moving the wheels in will raise the angle and increase the jacking effect. Moving the wheels out will do the opposite. Based on the track and grip levels, a driver will alter rear width (along with chassis flex and steering geometry if needed) until proper inside rear lift is achieved. There is generally going to be a range where the kart will have an acceptable amount of jacking. As long as the kart stays within this window for a given track and conditions, hopping from too much lift or binding of the rear tires from too little lift can be avoided. During cornering, the entire load of the rear of the kart will then rest solely on the outside rear while also keeping its contact patch at an acceptable angle. We've now successfully turned the rear of the kart into a motorcycle so it can corner properly.
The important takeaway here is that so far nothing we have done is about making the kart go faster by adjusting vehicle balance. We aren't adding or removing grip anywhere. Everything has simply been about getting the kart to work properly in the first place by unloading the inside rear so it doesn't bind and keeping the outside rear contact patch at a usable angle. Adjusting steering geometry, roll resistance through chassis flex, and rear track width does not change grip potential or balance. In fact, the vast majority of adjustments on a kart simply enable it to jack properly in different conditions. Unlike a car, where the suspension can be used to adjust balance due to load transfer, a kart is like a motorcycle where only by shifting weight forward and backwards can we alter vehicle balance. We'll see in a bit how that works, but first let's take a look at the other end of a kart.
How a Kart's front is like a Car
The takeaway message is to get your CG as low as possible and front tires as far apart as possible. This gives maximum grip at the front and since rear grip is constant anyway, we can just move the rear tires in until the kart is jacking properly based on the current CG location and track conditions. If you find yourself running out of adjustment and can't get the rear narrow enough to properly unload the inside rear during lower grip situations, you can then raise your CG if necessary. This is the reasoning behind sitting on a towel during a rain race. As the grip is significantly lower, raising the driver and thus the CG is sometimes needed to unload the inside rear to prevent tire binding.
Balancing Cg for Cornering vs Acceleration

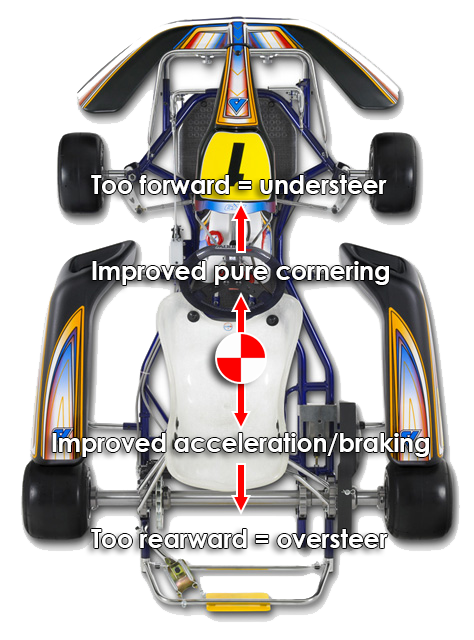
First let’s discuss lateral grip. If you were doing a skidpad competition where you just drive in a circle, the ideal front to rear weight percentage would about equal the relative tire contact patch sizes. Here is where tire load sensitivity comes in again. During pure cornering, moving weight rearward creates more relative grip in the front and increases oversteer. Moving weight forward gives more relative grip in the rear and increases understeer. You could optimize your balance by driving in a circle around a skidpad and move weight forward or backward until you maximized the speed attainable. In fact, for many lower-powered classes, this might be a good strategy because the karts do not have much acceleration potential anyway.
In a kart with more power however, you would most likely benefit from running a more rearward weight bias than what maximizing pure cornering might produce. Think of a drag racing car where all the weight is over the driven rear tires to maximize traction during acceleration. The amount of rearward bias is not just related to the power of the kart however, it is also related to the type of corners and conditions of the track you are running. Even a low-powered kart can sometimes generate wheelspin coming out of a tight turn in low grip conditions, and likewise a high-powered shifter kart is not going to be doing much acceleration during a 100 mph corner on a road course. So therefore, more power, tighter turns, or lower grip surfaces will generally need a more rearward weight bias than lower power, faster turns, and higher grip tracks. Optimizing braking works in a similar manner. On a kart with rear-only brakes, the more rearward your CG is located, the better your braking performance will be.
Hopefully you can see the compromises involved in moving weight forward and backward. Go more forward if you are looking for ultimate cornering ability, and go more rearwards if you are generating excessive wheelspin on corner exit and wish to improve forward traction. There is generally a fairly small range of CG locations you will want to use however, as we are really just adjusting the balance of the kart for the types of corners we will face. Going too far forward causes excessive understeer and going too far rearward makes the kart prone to excessive oversteer. In general, adjusting the CG location until you find a balance that is close to oversteer, but that you can still control will provide the best performance. Lastly, remember that moving your CG is changing your tire loads and will therefore affect how much the inside rear tire needs to unload during a corner. You'll need to take into account that moving the CG forwards will cause the kart to jack more easily and vice-versa. This might require you to adjust your chassis jacking settings to compensate.
Basic kart Chassis Setup Guide
- Start with a solid baseline:
- Maximum front track width (scrub radius) to reduce front load transfer.
- Minimum caster to reduce steering effort and counteract the large scrub radius.
- Minimum seat height without excessive bottoming to lower CG.
- Adjust seat placement and tilt for driver comfort aiming for a 55-60% rearward bias.
- Temporarily add ballast to bring kart to minimum weight aiming for 57-58% starting point rearward bias. Lower base weight will allow more adjustment with ballast placement.
- Start with minimal chassis stiffening attachments. This reduces base weight and allows greater bump absorption.
- Adjust for proper chassis jacking:
- Start with maximum rear track width. If the kart binds in the highest speed corner of the track reduce rear width until the inside rear tire starts to unload and balance noticeably shifts away from understeer. Measure and record width.
- Continue reducing rear width until the kart loses grip or begins to hop in the tightest or grippiest corner of the track. Measure and record width.
- Set rear width for middle point between measurements to allow greatest range to avoid handling problems caused by excessive or inadequate chassis jacking.
- If rear width changes do not allow enough adjustment to avoid hopping/binding in all corners proceed to other adjustments as necessary.
- If kart hops, you may increase stiffness by adding chassis stiffening bars at front.
- If kart binds, you may increase caster as needed or add chassis stiffening bars/struts to rear.
- Adjust ballast to optimize balance and corner exit performance:
- Once the kart is unloading the inside rear reasonably well, begin moving ballast forward or rearward to optimize balance. Adjust seat only if necessary.
- Other than optimizing tire settings such as pressure/camber, ballast placement is the primary way a driver can increase overall performance by optimizing balance.
- Remember that chassis jacking adjustments like caster and rear track width do not affect potential grip or performance.
- Lower-power karts/higher-speed corners will generally need a more forward bias and vice-versa. In general, balance should be close to oversteer, but controllable.
- Optionally, a driver may wish to increase overall chassis stiffness for quicker response on smoother tracks. This, as well as longitudinal CG location changes will alter the jacking effect so as you make stiffness and ballast adjustments you will then need to...
- ⤴ Return to section 2: Adjust for proper chassis jacking.
There can be many fine details to this process that will give you no end of setup work to do if you wish to delve deeper, but hopefully understanding the overriding physics principles and goals will keep you on the right track. Good luck!
by Adam Brouillard


